Recently
a customer brought in a very elegant old Gretsch guitar. He stated
that it has already been to another shop in the area (who shall remain
nameless to protect the not so innocent).
He
initially brought them the guitar because of a small separation at the
heel of the instrument - just about the thickness of a slip of
paper. The guitar had a few other problems - notably a two cracks
in the peg head, his pickup didn't work, The action was quite high and
it didn't play very well.
To make a
long story short - they suggested a neck reset - a change to a more
contemporary pickup, repairing the peg head, a re-fret, new contemporary
Schaller style tuners, and a host of other things that would have cost a
bundle.
They had
it for almost nine months - not necessarily out of the ordinary for a
major restoration. However, when he popped in to check on it's progress
- they initially wouldn't show him the guitar - They said it was back it
the shop and couldn't be moved - of course, for insurance reasons - he
couldn't be escorted into the shop to see it. After a few more
months, more calls and failed attempts at seeing the guitar - he got
quite angry (understandably) and demanded to see the guitar - they then
handed the guitar back to him and proclaimed that the guitar was fixed -
it was beyond complete repair but they had done the best they could with
it and here's your bill.
He brought
us the guitar and asked us if there was a way that it could be rescued
from the work someone else had done - Now I am not one who is altogether
to quick to criticize the diagnosis, work or reputation of another shop
- BUT - the state that this guitar was given to the customer it was
inexcusable.
Here is
what we found and what we did to restore this guitar to it's former
glory.
 |
|
Unfortunately,
I didn't remember to start taking pictures until the instrument was
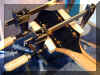
disassembled. So we begin - "in progress". |
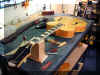
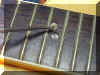
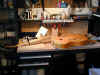
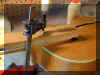
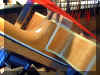
Here is the instrument
in question. The parts have been stripped and the body has been
wiped down with a Naphtha soaked rag. You can see from the
fingerboard that this guitar has seen quite a bit of use. |
When
doing a big job like this - I like to break things up into small
jobs. This way the instrument eventually gets done. It seems
easier to me to tackle a lot of small projects than one really big one. |
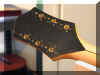
The first thing we will look at is the peg head. You can see all
the extra holes from the Schaller tuners that were installed. The
cracks and old tuner holes still remain. Lets take care of the
cracks first. |
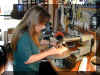
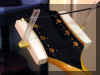
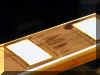
Here is Sharon making
the clamping cauls for the peg head. |

She traced the contour
of the peg head onto a piece of tape and merely placed it on a block of
wood. Now she has a template to follow when she cuts. |
We want to be able to
clamp the peg head along it's entire length.
|
The cauls are marked
left and right - but of course that depends on which side of the guitar
your standing on and which part of the guitar is facing up isn't
it. |
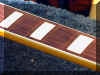
The cauls are lined with
cork to protect the finish. |
This will ensure good
even clamping pressure along the entire length of the crack. |
These mini Berna clamps
are just the thing to hold things in place while I check the fit of the
cauls. |
By the way - see what I
mean about left and right. |
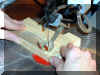
A few fairly thick
feeler gauges hole the crack open nicely ... |
... so when glue is
injected deep into the crack ... |
... it makes the job
easier to do with one set of hands. |
We elected to inject the
glue to make sure that we got way down into the deepest part of the
crack. |
Here is a close up of
the glue filling the crack. |
t Just a couple of small
bar clamps will give us all the clamping pressure we need. |
Not much squeeze out
here - a lot of the glue ran into the tuner holes and the screw holes. |
|
Here's a close up after
cleaning up the glue squeeze out. |
|
|
|
Now
that the peg head is glued let's take a look at the rest of the
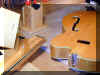
guitar. Remember that game they used to show on Sesame Street .... |
... which one of these
things don't belong? Well take a look at these inlays. Does something
strike you as being out of place here? |
That
was my first clue that something wasn't right. I am not a big fan
of seeing things "added" to a guitar for no apparent reason -
there is always a reason - an it normally isn't good. |

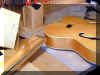
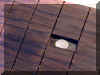
So much for a neck
reset. According to the customer - this gap was smaller when he
originally took it to the "Other Shop". |
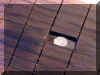
I was curious about that
"Extra Inlay" in the fingerboard - so I peeked in the pickup
cavity - What's that me thinks I see? Hmmm a mystery.
I like mysteries. |
Now let's remove the
inlay to find out what's really going on here. To remove a dot inlay
from a board - merely drill a hole through it - We already know what we
are going to find - don't we? |
Well - look what we have
here. Why it looks like a screw head. |
And I bet there is some
sort of screw attached to it. Neck reset ? |
Hmm - I wonder how long this
thing is?? |
I don't think I have to
tell you that this was not the way to fix a loose neck joint on a
guitar. |
|
That's a mighty big bolt
- I guess they were afraid the neck might come off. |
|
|
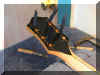
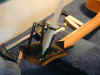
Now actually re-setting
the neck is possible |

We had to glue some
wooden shims in the mortise to ensure a good - tight fit. |

Here is a good shot of
both the mortise and tenon of the traditional dovetail joint. |
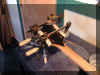
When I have a good
fitting dovetail - I can proceed in gluing and clamping everything up |
I actually don't have
any pictures of the trimming of the joint - I sometimes forget to keep
taking pictures. Sorry |

With a good fitting
dovetail - you don't really need a whole lot of clamps. One clamp
will do - notice the long caul on the neck. - the small one on the back
is lined with felt padding. |
The long caul spreads
the clamping pressure evenly. |
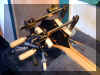
Notice the red band
clamp. |
I don't think it is really
necessary - but it maintains backward clamping pressure on the
neck |

Like I said - a good
fitting joint doesn't need it - but I like a little insurance now and
then. |
Notice the tight fit on
the "cheeks" of the heel. |

Here is a good close up
shot of the heel joint. |
All that's left to do
here is clean up what's left of the squeeze out ... |
... and wait for it to
dry. |
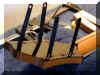
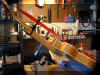
I always
"test" my dovetail joints with heavy gauge strings to make
sure everything will stay put before proceeding with the job. |
|
|
|
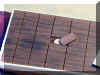
Now
we have to figure out what to do about this unsightly hole at the 19th
fret of the fingerboard. I certainly didn't want to put an inlay there
to "cover it up". |

There wouldn't have been
an inlay at the 19th fret of this model guitar. |
So
we'll just have to "bury" it. The Idea here is to mask the
damage to the guitar so it doesn't draw attention to itself. If I
can make it disappear - all the better. |
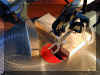
First order of business
is to chisel out a cavity that extends to each of the surrounding fret
slots. |
Then I can plug the hole
with pretty much anything I want. |
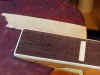
I elected to use a maple
dowel. It was handy - It was left over from another repair we did
recently and it was just the right size. |
Once that was glued into
place, trimmed and left to dry - I cut a piece of rosewood from a
scrapped fingerboard we had around the shop |
The color was pretty
much the closest thing I had - and the grain was reasonably the same. |
I beveled The edges of
the cavity and my little insert to match. |
|
A little cyanoacrylate
glue fills up the cavity and in goes my patch. |
|
Now that the patch in
the board is glued in - I can get to leveling the board.
You can see that this thing was well played from all the deep pits in
the rosewood. |
This took quite a bit of
sanding - If I thought that I would run through the inlays - I would
take them out and re-install them after the board was level. |
As luck would have it -
I didn't have to - Most of the inlays had sunk down into their cavities
- don't ask me why - maybe - they shrunk over time - maybe the glue
underneath settled .. |

.. your guess is as good
as mine - I am just glad I didn't have to take them out. Still got
a ways to go on this board. In this picture you can see the lip
surrounding the inlays - These things were really sunk in there. |
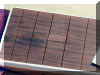
Here are board is
leveled and ready for frets. Those inlays hardy got a shave. |
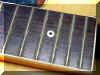
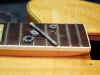
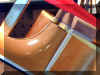
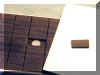
Here is a good look at
that 19th fret where the hole in the board was - Not a bad disappearing
act - don't you think?
Buy the way - that hole in the side of the board is to mount the
pickguard. |
|
|
|
I
decided to dispense with pictures of the re-fret, crowning, making of
the new nut, tuner installation and re-wire primarily because there are
plenty of other places on this site that you can see those procedures.
Not to mention that my digital camera had to go back to the manufacturer
for repair. Suffice it to say that the old pickup was fine - it had to
have new leads soldered to it though. We replaced the pots and
other electric components because they were shot. Before the
guitar got re-assembled we compounded and buffed the finish to get it to
look as good as we could. Here is the final results. |
|
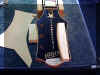
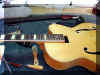
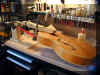
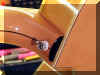
Here is a shot of the
guitar - all done. Let's run through the details |
|
Here is a shot of the
heel joint - snug as the come. |
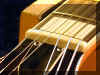
I strung the guitar with
a set of .013's just to see how the neck would hold up. I had originally
talked the customer into stepping up to .012's (he wanted a set of
.011's) |

After setting up the
guitar with .013's - I thought it played so well and the guitar spoke
with such a bold tone - I just left them on there - It played so well he
though they were a set of .011's.
I eventually told him they we .013's |

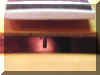
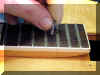
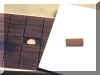
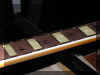
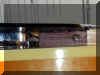
Here we can examine the
patch job with the frets in. |

Even upon close
inspection - it is hard to tell that there was anything done here. |
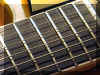
Here - have a real good
look at it. |
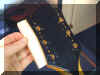
A quick shot of the new
nut. I prefer bone above anything else for nuts. |
Wendy Davis from WD
Music Products rushed me this pickguard. I had completely forgot that we
needed one (I was under the impression that we already had it) the
guitar was done and I was about to set it up when I realized it.
The folks at WD really came through for me. She rushed me a Gretsch
blank and I notched it for the pickup
. |
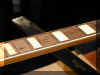
mounting the pickguard
to the side of the board was easy - here's a peek.
|

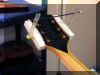
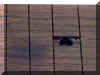
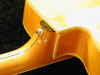
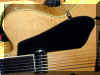
Here is the back of the
peg head - no holes were they shouldn't be and the cracks are all but
gone. |
Now
before anybody gets all bent out of shape - I KNOW that these are not
the original tuners that would have come on this guitar - they were the
customers choosing and the holes line up just fine - so who am I to
argue? |

I think they look rather
nice though. It is hard to tell the peg head was in pieces once. |
|
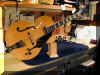
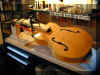
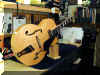
It really is an elegant
guitar don't you think. The customer couldn't pick up the guitar
for a few days after it was done. I can tell you we all had great
fun playing this one - wish he would have waited a few more days to pick
it up. |
|
|
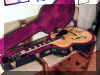
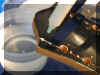
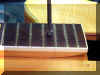
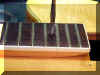
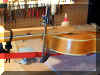
The original case was in
worse shape than the guitar originally was - so we thought a new one was
warranted. We want to keep this well protected. The owner still
has it - but I think he should carry the guitar in this one. |
|