|
Q: I have heard of so many
different methods of keeping rosewood fretboards from drying out that I am
now totally
I have heard of so many different
methods of keeping rosewood fretboards from drying out that I am now totally
confused. I've been told "use lemon oil once a year (but for God's sake don't
use store bought lemon oil!)", use 3-in-1oil (contrary argument-any petroleum based
products will rot the wood), etc.
Could you please let me know how I should properly maintain my rosewood fretboards to
prevent any damage to them? Is this even really necessary here in the wet Pacific
Northwest (Seattle area). Any help would be greatly
appreciated.
Thanks,
Mark Snyder
A:
Mark,
Here is your final answer - First of all prior to putting any oil on the fingerboard
(rosewood) you should clean it first. It doesn't make any sense to put oil on a
dirty board. The best material for cleaning the wood is Naphtha. you can find
it in any hardware store. In fact it has such a high evaporation rate that you could
clean the whole guitar with it prior to polishing - don't use it near any open flame and
make sure you are it a well ventilated area.
After the fingerboard is clean you can use a little "0000" steel wool to buff up
your frets - this makes them much smoother to play on - Make sure you tape off the pickups
if we are talking about an electric guitar. The you can repeat the naphtha if you
want to get rid of anything the steel wool leaves behind or works loose.
The you can use any kind of oil to replenish the moisture in the board that the
environment (or naphtha) leaches out. By the way Naphtha will leach moisture out of
the wood so you should use the oil after any cleaning with it The more refined the
oil the better - use any oil sparingly - one drop goes for quite a few frets - rub it in
hard & wipe away the excess. Lemon oil found in the supermarket is just fine as
long as it's only ingredient is oil. Don't use furniture polish or anything like
that - I have heard of guys using 3-in-1 but I wouldn't recommend it. We use boiled
linseed oil in our shop only because I don't like the smell of lemon oil - smells like my
grandmother's house
Hope this helps - If you need anything else feel free to contact me,
Musically Yours,
Doug Proper
Back to top

Q:
I ran across your web page while doing a web search for information on the Trem-setter
device. And, since you have so generously offered to answer questions submitted via
email, I'd like to pose one for you. Well, two questions, actually. One is,
what can I do about the tuning problems I am experiencing with my Strat? The other
is, how do you adjust a Trem-setter?
I suspect that a bit more information might be helpful at this point. So, here goes:
My name is Dave Ford, and I live in the Atlanta area. Music is my main hobby, but I
don't make a living at it. At this point in time, I don't know any luthiers in
Atlanta that I feel comfortable taking my guitar to, so I am hoping to be able to resolve
the problem myself. I am not overly skilled at working on guitars, but I can do
basic stuff such as setting the action and intonation. As long as I'm not risking
permanently damaging the instrument, I'm willing to try stuff.
The guitar in question is a '93 Fender Strat Ultra. It has the American Standard
tremolo with Trem-setter, locking tuners, and Fender's roller nut. The nut is *not*
the Wilkinson nut, which came stock on the guitar. It is the updated roller nut, the
one with the pair of bearings in each string
slot. I had problems with the Wilkinson nut sticking, so I had it replaced
(professionally installed with the aid of a kit).
This has been my main electric guitar for a while now, but it went through a period of
extreme inactivity for two or three years. About six months ago, I got involved with
a band and started playing electric again on a regular basis. Some time after that,
I noticed that the guitar was not staying in tune consistently. I mean, I'd tune it,
and by the end of the song, it would be out. Frequently, *all* of the strings would
be out, and they would all have drifted in the same direction -- meaning they would all
be a little flat or a little sharp. This happens on new or old strings -- doesn't
seem to matter. I did notice that playing the guitar hard with my right hand tends
to pull the strings sharp.
So that's the first questions, the general one: How do I resolve this tuning
problem?
The fact that the strings were going *sharp* (at least half the time) led me to suspect
that the Trem-setter was pulling them that way. After all, it's the only component
of the guitar that I know of which pulls the strings in that direction. It has never
given me problems before, but a couple of years of inactivity may have adversely affected
it. Bear in mind that I already tried dousing it in WD-40 just in case it was
binding. That didn't clear up the problem -- didn't seem to affect it at all, in
fact.
I seem to remember messing around with the Trem-setter a couple of years ago when I did a
setup on this guitar. I knew what it was supposed to do (I have Dan Erlewine's
book), but I didn't have instructions on how to adjust it (still don't -- all Erlewine
says it to follow the installation instructions, which is no help for those of us who
bought guitars that came with them stock). I think it's likely that I didn't adjust
it properly, but the guitar never exhibited these symptoms before (quite the contrary --
it has been Old Reliable). Even so, I'd like to know how to adjust it properly for
its own sake, and also because I'm hoping it will fix this problem. So that's my
second question. You guys say you can adjust this sucker... can you tell me how to
do it?
Thanks in advance for your willingness to help. I look forward to hearing
from you.
-- Dave
A:
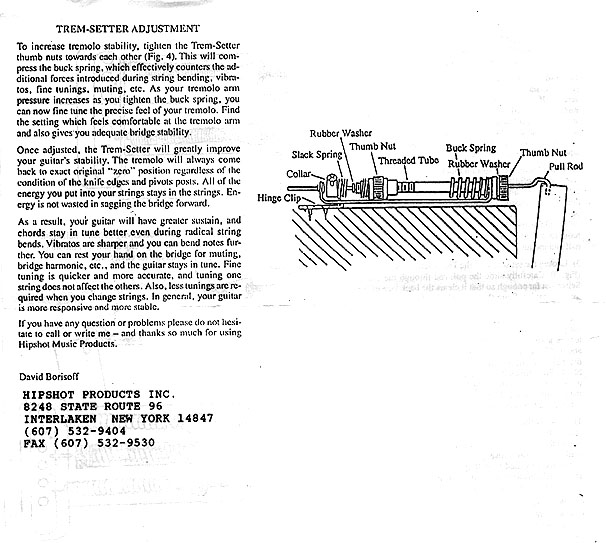
Hey Dave,
You are probably right that the tremsetter is at the root of your problem. Setting up the
tremsetter is a little tricky - but I can talk you through it if you want. First let
me know if you plan on doing it yourself or not. It is not hard but it can be time
consuming. One little secret about the tremsetter that I found is that it is easier
to set up as if you are doing a fresh install that trying to just turn thumbscrews and
hope for the best. I can fax you the install instructions if you wish so you will
have a good idea of how the thing is supposed to work - plus you can save it for the next
time - the one thing to remember with the tremsetter is that once it is set up properly
you should never loosen the set screw on the shaft of the tremsetter - once that is
unscrewed, you have to start all over. let me know if you have a fax number - if not maybe
I can scan it and send a JPEG or something. Let me know what works best for you.
Musically Yours,
Doug Proper
Here Are The Instructions:
Back to top
Q:
Hello, I have a Gibson 335 and the headstock split from the first fret diagonally towards
the front tuning pegs. The
Hello, I have a Gibson 335 and the headstock split from the first fret diagonally towards
the front tuning pegs. The first time this happened the gap was about 1/16 inch
wide and about one inch long. This was repaired about five years ago and has since
split again. The repairmen used an airplane epoxy and they said they had to split
the gap even more to insert the epoxy. Does this method of repair sound right to
you? How would you repair a headstock barely hanging on? Thanks for your help
and time.
Thomas
A: Hi Thomas
Sounds like you have a fairly stubborn repair there. It is possible to repair
the guitar properly, However since the headstock was broken, repaired, and broken again,
it does make it a bit more difficult. I probably would not have used airplane epoxy
- or any epoxy to begin with - The best glue for the job would probably been Aliphatic
Resin. Since this would be a re-repair I might be inclined to do what's called
"Spline" the joint or use splines across the break - to strengthen the area
where the crack is. I don't know if the original shop would have had to split the
gap even more to repair it - It is hard to say - maybe they thought they had to in order
to get the epoxy all the way in there - Since I am not a fan of
epoxy - I probably wouldn't have gone that route. Most glues have a high enough
viscosity to make their way through the needle of a syringe so that would have been my
approach.
In any event make sure you have the right repair guy look at your guitar - a re-repair is
harder and more critical to do right that a first time break - so take your time to search
for the right shop to do it and do it right.
If you would like to have us do the repair feel free to call me to discuss the job.
We accept repairs shipped to us from all over the country if you are not within driving
distance from us.
Click here for more on
headstock repairs
I hope this has been some help - If you need anything else feel free to contact me.
Musically Yours,
Doug Proper
Back to top
Q:
Hello! my
name is Claudio Riggio, I'm an Italian composer-guitarist and I would like to
know the whole
instrumentation of John Abercrombie.Please, could you help me someway? I
have a custom
guitar, acoustic without hole, with an highlander piezo and custom humbucking. My sound is
close to Abercrombie's voice, I
need to set the gain of my tube preamp( Brunetti )at
the maximum level, so I can play very softly, but
I have a problem: to
reduce the noises (
plectrum and left hand)...Please, could you give me some advice?
Thank you in advance,
Yours faithfully
Claudio Riggio
A:
Claudio,
As far as John's sound is concerned, he does have a very unique sound that is surprisingly
consistent no matter what guitar he is playing. He has more guitars than you could count
(a figure of speech of course). But he seems to get a similar sound on whatever he
plays. his main guitars these days are as follows.
A Brian Moore electric with 2 humbuckers and piezo elements in the bridge. It incorporates
a 4-pole 5 way switch that enables some interesting pickup combinations. Some really
involved electronics as you can imagine.
A Roger Sadowsky, Strat style guitar.
His trusty Ibanez Solid body.
He uses a Gibson Chet Atkins Acoustic occasionally as well. Although he probably uses the
Brian Moore to get a quasi-acoustic sound just as much as the Chet Atkins.
He also records occasionally with a Gibson ES175, or one of two Archtops that Rick McCurdy
made for him.
That's just to name a few
So as you can see it is not necessarily the guitar that gets his sound.
As far as amps are concerned - his basement full of them. He has a pretty involved setup
(it looks like NASA down there. Although, In recent years, he has opted to use
"house amps" whether in the studio or on the road. So the amp can't have much to
do with it. In my opinion, he gets his sound from his playing style and technique. He has
a very unique style, and unbelievable technique. He does not use a pick and hasn't
for quite a few years. He only uses his thumb and sometimes employs his fingers. But
mostly his thumb. He has an extremely light touch, which allows him to have an
extremely low action. We developed a procedure of tapering his fret height to
accommodate his playing style and allow for the low action (I'm talking about 1.5 64ths of
an inch in string height)
So as you can see I think it has as much to do with your playing style and technique as is
does with your gear.
I hope this helps. If you have any other questions please get back to me.
Musically Yours,
Doug Proper
Back to top
Q:
Doug,
Can I ask you a question about polishing small fingernail
scratches from a new guitar which doesn't have a pickgaurd? I went to my favorite
guitar store the other day and I played a Taylor Koa grand concert guitar for a while,
when I hung it back up on the wall I could see small scratches from my fingernails in the
finish. This is a $3,000+ Guitar. It's been really bothering me that It may effect the
salability or value of the guitar. Any advice...Cut my wrists...No, wait!?
Thanks Gregg
A:
Gregg
The Only answer that I could give would be to compound the finish
as you would the finish on a car. Meguiar's make a very good brand of compounds
called "Mirror Glaze". Start with their fine cut cleaner #2, then move to
the swirl remover #9, and finish up with the show car
glaze #7. That should do the
trick.
Good Luck
Musically Yours,
Doug Proper
Back to top
Q:
Aloha,
I have an original 1952 Les Paul Gold Top (trapeze) that I would like to get back into
playing condition. I would like to have an ABR type bridge and a stop tail piece installed
as well. I was informed that a neck reset may be necessary to get the action set up right.
I am aware (and have been told by several repair shops locally and appraisers) that by
installing a stop tail/ABR bridge assembly, that the resale value of the instrument would
be significantly compromised. However, being that this guitar once belonged to my late
father, and has been passed on to me, the issue of it being "sold" is not even a
consideration. With that being said, I would like to begin dialog as to what action might
be taken in order to realize my goal. And, if events transpire requiring the
instrument being shipped to you, what steps need to be taken to insure safe passage. This
project has been contemplated for several years now, and I look forward to hearing from
you at your convenience.
Thank you very much,
Ken Lara
A: Ken,
As you probably already have heard, doing such a conversion would seriously affect the
instrument's value. So careful consideration should be made before making such a
conversion since it is not reversible without serious cosmetic consequences. I understand
that you do not plan to sell this instrument, but I would be shirking my responsibility to
the guitar community at large if I did not at least mention it.
The conversion you are interested in would certainly increase the sustain of the
instrument. make sure you have the right shop do the job - a poorly done conversion
could be a disaster. As far as a neck reset having to be done to accomplish this -
that may or may not be true - It would be impossible to tell without inspecting the
instrument. We have done several such conversions on both solid body
and archtop
guitars (hollow body guitars are much harder as you can imagine) If you would like
to discuss the repair further or have any other questions please feel free to contact me -
by e-mail or phone. The telephone # is listed on the web site.
Musically Yours,
Doug Proper
Back to top
Q:
I would like to know if guitar tuning machines are repairable, or do they have to be
replaced when a problem arises. I have a Cordoba 75r classical which developed a binding
4th string tuning machine. After disassembling it, I found the only thing I believe to be
wrong with it are two nylon spacers, that were deformed. One is located at the key end of
the shaft before the spacer and the other on the other side of the spacer, closest to the
worm gear. After moving things around it worked pretty good but doesn't hold as well. Do
you know if there are any replace kits available for such a repair or do you
think replacing the whole section is the only solution?
Thanks
Sincerely,
Mario Toscano
A: Mario,
The answer to your question is two fold - yes they are repairable and no there is no kit.
Actually there is a kit for tuning repair - but it is fairly expensive and has hundreds if
not thousands of parts in it. we have one in the shop but I would have no idea as to
what parts to send you - not without seeing the machine. the problem is that tuning
machines are not standardized in any way, shape or form when it comes to the components
that they are made up of. in terms of tolerances for size and dimensions of parts -
they run the gambit. We keep several drawers full of spare and broken tuners for
precisely this reason so when it comes time to repair tuners we go digging - it is kind of
like a treasure hunt. most times it's successful.
If you have a second guitar to play I would not object to having you send me the machine
and I'll go digging for you to see if I have the parts you need - unfortunately that
would be the only way we could do it (if you are within driving distance you are certainly
welcome to come to the shop of course).
Let me know if I can be any further help.
Musically Yours,
Doug Proper
Back to top
Q:
Hey
guys,
I have a 1971 Gibson Les Paul Deluxe (2 mini-humbuckers), and I
replaced the volume and tone pots recently. My question is, what difference in sound
(tone) can I expect from using say a 500k pot as opposed to a 250k, etc. Right now I
have a 300k linear taper pot for the neck pickup volume and I think a 500k audio
taper for the bridge pickup. I like the response of the linear pot more than the
audio taper, but is 300k alright to use with the mini-humbuckers. This
pot (the 300k)
is a Gibson part, the others are generic. Of course I want as much signal and the
least amount of noise as possible. Thanks...........
Rhonea
A:
Rhonea,
Great question - the subject of guitar electronics can often be a confusing labyrinth for
a lot of guitar players.
The answer to your question is that a 250k potentiometer will generally give you a
slightly warmer tone that a 500k pot because it attenuates more of the higher frequencies
to ground that a 500k pot will. In other words is allows more high frequencies to
pass to ground because of the pots rating. You can actually effect the rating of a
pot by installing what's called a treble bleed circuit to the volume pot - and change the
pot to say a 500k to a 300k. this has an interesting effect on the tone of a guitar
- some player swear by it and others hate it. Joe beck's signature models all come
with this bleed circuit installed (it is basically a capacitor & resistor wired
between the in & out lugs on the pot) Joe has me remove it on every guitar the
manufacturer sends him to use. (he obviously doesn't like the sound it produces - the
effect is that when you roll of the volume a bit the bleed circuit retains the highs
from the signal and allows them to pass to output rather than attenuate to ground
witch a potentiometer seems to want to do naturally. Joe like to warm up his tone by
rolling back his volume knob just a bit - which the bleed circuit doesn't allow.
The taper of the potentiometer indicates the rate at which the resistance changes
when the shaft is rotated. The audio taper changes resistance at a faster rate at
the extreme counterclockwise (softer) end of rotation than it does at the extreme
clockwise end of rotation (louder) end. The linear taper changes the rate of
resistance at the same rate throughout the range (or sweep) of the rotation - which is
probably why you like them better. Another type of potentiometer is a reverse audio taper
- which changes resistance opposite that of the audio taper faster at the loud end of the
sweep than the soft end.
The most common type of pot is the audio taper - however, in the final analysis it really
doesn't matter which type you use - It depends on your preference - If you are the kind of
player who uses plays with the volume or tone at all different levels and is adjusting
things often throughout the course of a tune the linear taper might better suit tour
needs. I would advise you - whatever you decide to use in your guitar - to keep all
of the pots in your guitar, not only the same value of resistance, but the same taper
- it will give you the most consistent results.
Hope this helps - If you have any other questions - feel free to let me know
Musically Yours,
Doug Proper
Back to top
Q:
I have a '76 Fender Telecaster with a maple neck that looks like
it hasn't been cleaned in quite some time ( due to my neglect and the former owners ).
I'm finally taking the time to get it into decent playing condition and I want to
give the frets and fret board a good cleaning I've read other posts regarding rosewood
fingerboards any suggestions for a maple fingerboard? I assume for the frets
"0000" steel wool and tape off the pickups as you suggested for a rosewood.
Thanks
Dave
A:
Hey Dave -
It is always a good idea to keep the finger board clean on a guitar - it will be more
pleasurable to play and your strings will more than likely last longer. As far as
cleaning a finished maple board is concerned - here's the scoop - to loosen dirt Naphtha
(from a hardware store) will do a great job - (work in a well ventilated area and wear
gloves) It's high evaporation rate will allow you to aggressively clean the board with out
risking the lacquer. Then tape up the board between the frets - use the lightest tack tape
you can find & be careful when removing the tape so you don't chip the
lacquer -
or you can get a product Stew Mac sells called fretboard guards - it is a small piece of
steel that has a slot cut out to fit the fret through - so you don't have to tape up the
board. (a nice little trinket to have if you do this often) Then follow up with another
naphtha bath to catch anything the steel wool leaves behind - On finished maple
fingerboard you should never use any kind of oils to treat that board like you would on a
bare wood board (rosewood or ebony) - if you want to bring back the high gloss that was
there before you used the naphtha you can use a little guitar polish and buff the board to
a shine with a felt or cotton polishing cloth - otherwise you can just buff with the cloth
to achieve a somewhat duller sheen.
Hope this helps
Musically Yours,
Doug Proper
Back to top
Q:
Doug,
I just found out about your
website off a newsgroup, and I checked it out it looks great! I have a
couple of quick questions.
First:
During a recent show my guitar
was damaged, involving some stage antics and a wet floor, let's just say
that a wireless system is something to be careful with.
Anyway, the break splintered
it's way up the neck to the headstock and is very similar to the one that
you show on your headstock repairs section, the second repair example I
believe. The headstock was still attached but badly cracked. I sent the
guitar to the company I ordered it from, Carvin, they have told me that
they did glue it and were holding it over a period of a few days to see if
the repair would hold with the guitar strung up.
My question is if this repair
does hold for now, how long will the glue hold in the future? Carvin said
that it was not a guaranteed repair. If I'm not satisfied with the repair
is this something that you could possibly guarantee. Could you re-repair
it to make it guaranteed? I'm sorry this probably doesn't help much unless
you could actually see the guitar, but any advice you could give would be
appreciated, because this was a new guitar and I enjoyed it very much.
Thank you,
Darcy Collins
A:
Hi Darcy -
Sorry to hear about your problem - having a
new guitar break in such a dramatic way can be very disappointing. I am
surprised that Carvin would not guarantee the repair - By the way which
Model are we dealing with - is it a set neck or a bolt on? In answer to
your question - the glue joint - theoretically should be
stronger than the wood that is surrounding it - do you know what kind of
glue they are using? - always a good question for a luthier doing a job
for you by the way. I am encouraged when people ask a lot of questions
regarding a repair - it shows that they are interested in not only the
results - but the process. Back to the Carvin - Like I said - I am
surprised that Carvin would not guarantee the repair - sometimes this is a
nice way out of the responsibility of follow-up for the manufacturer doing
the repair - Did they at least offer you the option of a new neck that
could be guaranteed ?
As far as our shop is concerned - We
maintain that every structural repair we do is guaranteed for life -
within the reasonable parameters of the repair - if we fix a headstock
crack and you drop it on the floor again - then it is not guaranteed - or
if you have us reset the neck on a vintage Martin - It is guaranteed -
however - that guitar may need another neck set in about 20 to 25 years,
about the average life span of a neck set on those guitars. I have rarely
seen a neck crack repair that could not be guaranteed - the may be just
trying to cover their "you know what".
If you are not satisfied with the result -
most likely it could be "re-repaired" or attended to is some way
- but understand it is always harder to re-repair something than it is to
just repair it right the first time - This is not to say that Carvin won't
to a great job. They more than likely will. By the way - you are right -
It is hard to say without seeing the instrument - But in my shop - I wont
fix it if I can't guarantee it.
If you need more help or have any questions
when you get the guitar back - Please e-mail me - I would like to help.
Definitely let me know how it came out when
you get it back - I would really like to hear how this one works out for
you.
Musically Yours,
Doug Proper
Back to top
Q:
Doug,
I'm sure you don't remember but I wrote you
a while ago because my Carvin guitar had a broken neck at the headstock
very similar to the ALV2 picture section of the repair section. Anyway I
had it repaired by Carvin and they did an excellent job but I was
wondering, I currently use 9 gauge strings before I broke it I used 10's,
I was wondering if this type of repair would be able to hold with the
string tension of 10 gauge strings because I'd like to use them if I
could. I'm not sure what type of adhesive they used I know that would help
but if you could give me some idea that would be great.
Thanks,
Darcy Collins
A: I
do remember when you wrote a while ago. My guess would be that increasing
the string gauge to a set of 10's should be no problem (I don't know if
you already have). On an electric guitar nickel would string set, the
tension would increase only by about 18 lbs. of pull over all. I can't see
why a properly repaired neck couldn't hole that kind of tension easily.
Suffice it to say that if it doesn't - It wasn't repaired - but I wouldn't
worry about it. In our shop we string up a guitar that has had a neck
break with 13's and let it sit for a few days just to insure that it can
hold that kind of tension.
Let me know how it works out.
Musically Yours,
Doug Proper
Back to top
Q:
Hello!
I don't know how often you check this e-mail account, but I visited your
web site today and have a repair question for you. A
friend of mine dropped her Alvarez acoustic the other day, leaving a crack
in the back of the neck approximately 1" from the nut. I'll try to
diagram it here:
\ Headstock /
|
|
| x x
|
| x x
|
| X X
|
| X
X |
| X
X |
As you see, the crack is somewhat crescent shaped, and although it is not
severe (it seems to go just a little deeper than the finish; some wood is
involved) and although there is no gap to the crack, I fear that more
structural damage may occur. How much of a disaster is this? Would you
contact me and tell me how much a repair like this typically goes for
(i.e., is this just a superglue job or is there drilling required)? Is a
repairman of your talents (nice stuff on the site, by the way) capable of
doing something like this? Let me know ASAP. If you can get me a reply by
today, I would appreciate it, but I understand how busy you must be.
Thanks much for your help.
Sincerely,
JOSH WESTERHOLM
A: Joshua,
To answer your first inquiry - we check this e-mail account every day.
Judging by the diagram - I'd say that you have a fairly common crack there
- at least common when a guitar is dropped on the floor. If you suspect
that the crack is not superficial and it is in fact in the wood and not
just the finish checking, I would immediately loosen the strings on the
guitar - if you haven't already.
It needs to be repaired. A
crack running along the grain like that is very deceiving - the neck has a
certain amount of strength - and since the crack is not very deep - most
of the strength is probably still there. If you don't have this taken care
of right away - chances are that the pull of the strings on the neck will
continue to pull the crack apart over time - the
longer you wait - the worse it will get. As far as how to repair it at
this time - that much would be hard to say without actually seeing the
instrument. To venture a guess based on other repairs I have seen like
this one - there are a couple of ways - depending on the nature of the
crack - if the crack is not that deep - glue needs to be worked into it ad
clamped up.
After it is dry some minor finish repair could make it good as new.
If the crack is too tight for
glue to be worked in - the crack may have to be spread open to facilitate
the gluing. Another possibility is to drill two very small hole into the
crack - just large enough for a syringe to fit in and force glue in the
crack that way - after filling the holes and some finish touch up - it
should be barely noticeable.
In any circumstance - I
probably would not elect to use cyanoacrylate (super glue) on this one -
it would be way to messy to clean up when the neck is clamped and probably
damage the finish even further.
The answer to you question
about whether we are capable of doing this - is yes - we do these kind of
repairs all the time. As far as the cost - it could be as low as $65
depending on how much finish work there is, the procedure that needs to be
used, how invisible you want the repair to look - etc. - you get the idea.
If you want to contact me about the repair - feel free to contact me at
the telephone number listed on the web site - by the way - where are you
located - it is always nice to know
Don't forget to sign up for our mailing list at the site - you will be
notified of all updates and events.
Musically Yours,
Doug Proper
Back to top
Q:
Doug,
Thanks so much for the extraordinarily quick reply. I think it clocked in
at just over an hour from writing it until I had it on my
desk. That means a lot to me: I appreciate a business that cares enough to
handle their customers (or even potential customers) that way.
I don't yet know what will happen with the guitar. I will pass your
warnings along to my friend who owns it, along with the price information
(again, thanks for the options you presented and the price information--
most helpful).
One other query for you: do you ever handle mandolin repairs? I was given
an ancient-looking mandolin by a friend's grandfather. It's pretty beat
up--- not a collector's item or anything, but just recently the neck
started to warp. It was once playable, but now I can't seem to get any
notes out of it; it is fretting out and buzzy, etc. The instrument doesn't
appear to have a truss rod, but is there any way that its neck can be
fixed? Let me know what you think.
I am located in the Chicago area; if either repair sounds feasible, I
would be willing to ship the instrument(s) to you. Thanks
again for all of your help.
Very sincerely,
JOSH WESTERHOLM
A: Hi Josh,
The answer to your question about mandolin repairs is a qualified yes. We
do a great deal of mandolins - however - a small caution - In order to
determine whether or not the mandolin is worth repairing - it would help
to know what you have there. In other words, if you have one of those old
bowl back Italian style mandolins - chances are it would cost more to ship
it here than it is worth in terms of inherent value - and maybe even not
worth fixing. Even if it is in good structural condition, it is very
likely that it would need a re-fret to get the neck back to where it
should be so it is playable. Those bowl backs are pretty common and not
worth very much � If it is and instrument of any considerable value than
it may very well be worth it to get it in playing condition. Let me know
what you have got there and we can discuss it further. You can always call
(the telephone number is listed at the web site) if it is too much to
describe it via e-mail.
Let me know what model of Alvarez your friend has - so I can give you an
idea of the instrument's value compared to repair cost - maybe that will
help her makeup her mind.
If I can be of any more help - let me know.
make sure you sign up for our mailing list - you won't miss a thing that
way - access the mailing list sign up at our site - www.guitarspecialist.com
Musically Yours,
Doug Proper
Back to top
Q:
I saw on your site that you
don't recommend neck resets. However, I have a RIC 4001 that the neck had
been broken off by a previous owner, and glued back on relatively
well. But now the break is coming apart, and is no longer attached to the
body wings.
Here is some more detail about the break:
The break is at the heel of the neck, just above the body, and is parallel
to the back of the bass. It left a 'shelf' of wood about 1/4" wide
and about 1 1/2" to 2" long. It was glued back together pretty
well, as the crack is barely visible. The problem lies in that the neck
separated from the body wings about an inch on both sides, and due to the
routing for the neck pickup there is a lot of flex in the joint. Somebody
then drilled holes at an angle from the neck wood into the body wings and
used screws to tighten it up (this is all in the neck PU cavity, and well
hidden with the pick guard on).
I drilled out the screw holes and glued in dowels to strengthen the join.
While the neck was more stable, it still had some flex to it and strung to
pitch the neck crack began to separate.
My options so far are to try to separate the neck
along the original break, clean it up, and then reglue it to the body and
remaining neck wood. Or I could try to remove the body wings, inject glue
into the cracks and clamp them shut, then reglue the whole bass back
together. The problem with this is damage to the finish and damage to the
gluing surfaces of the wings and neck (splinters, splits, etc.).
Do you have any suggestions on how to approach this
problem?
Thanks
Dan Neyman
A:
Hello Dan,
I would not consider trying to separate the wings of the body - I think
you are opening a whole new can of worms there. The best approach (this is
obviously without seeing the guitar) would be to remove the neck along the
originally break and re-repair it. Unless the original repair was done
with epoxy - any other glue should be able to be softened with a little
bit of steam (we use a Mr. Coffee Cappuccino make with a hose and needle
attached to the steam attachment. This should help soften almost any glue
joint to help you separate it. From there it should be a straight forward
repair.
By the way - I am not against doing neck resets. I should probably clear
that up on the web site. I was merely stating that it is a procedure that
to many shops jump to doing to often when it is not necessary. There is a
shop near us that would recommend a neck reset even if you brought them a
guitar where the only complaint was it was missing a tuning peg. We do
neck resets in our shop all the time (we have about six of them in the
shop right now). I was merely musing on the point that I think it is a job
that you do ONLY when absolutely necessary. I hope that clears it up - and
as I said it is something that I should make a little clearer on the web
site.
Let me know how the job works out for you. If you have the gear to do it -
you can always send me pictures of the task at hand - maybe that way I
could be a little more help. If you want I can send you pictures of our
steam setup.
Let me know how things go with the job.
Musically Yours,
Doug Proper
Back to top
Q:
Thanks for
the reply. I agree that removing the wings would be a nasty job, and
I was trying to avoid it if I could. My original plan was to remove the
neck along the original break, but I wanted to get some professional
opinions on which way was the best to restore this bass to playable
condition.
I've built a steamer out of an
old pressure cooker and and a ball inflator needle. I think I'm set to go,
and I'll email you and let you know how it works.
Thanks again for the advice
Dan Neyman
. . . . Well, I steamed
off the neck today. It only took about 5 minutes to completely remove it,
and another 10 minutes to clean off the excess glue. The neck separated
from the rest of the body as slick as can be, leaving a great surface to
reglue. Thanks for the advice on the steamer. It sure saved me a major
headache trying to take the whole bass apart!
Dan Neyman
A:
Dan,
Great ! - you did the textbook version of pulling a neck off of the
guitar. Good Luck with the rest of the job. Let me know how it works out.
If you need any help along the way - don't hesitate to contact me - by
email or phone.
Incidentally - I don't know how far along you are (so it might be a moot
point), but once you get the neck steamed off make sure you let it sit for
a few days before you attempt gluing. This will ensure that the moisture
leaches from the joint - you would be surprised how much the joint will
swell - even only after two minutes of steam.
Keep me posted - I am interested in your progress.
Musically Yours,
Doug Proper
Back to top
Q:
I
recently bought a brand new Larrivee Parlor Guitar. If you are not
familiar with the instrument, it is a smaller scale
guitar joined at the 12th fret and > tuned normally. It played
beautifully in the store (in a humidity controlled room), but when I got
it home I noticed a very persistent and annoying buzz coming from the low
E string. Everywhere else it's perfect, but on the first five frets of the
E (it disappears at the sixth), it rattles like an African thumb piano,
making open E and G chords out unmistakable. I took it to a local repair
guy, who looked it over, tapped it, and told me that everything on it was
perfect- the frets were all lined up right, the neck was set right, the
action was already fairly high. The only thing he thought would possibly
cure the buzz was raising the saddle. He told me to try cutting some
strips of an old credit card, and putting them under the saddle, which I
did. It took a thickness of three layers of credit card to raise the
action high enough to kill the buzz. However, while the buzz is gone, the
guitar is much more difficult to play on the lower strings (I only raised
the bass end of the saddle, so the high strings are still low.)
While I realize that this method for
raising the saddle is not the best, tonally, it seems to have proven the
point that raising the action will take care of the buzz. My question is:
can this guitar be both playable and buzz free? If not, I
still have two weeks to get my money back from the guitar megastore I got
it from, but I will be very disappointed.
DRS97
A:
Hi
DRS97, (let me know what your name is next time)
I am familiar with the guitar - and I am also curious - If it played great
in the store and them you got it home and things went south from there -
something must have changed. By the way is it especially humid where you
live?
It seems to me that the first thing to check is that the neck didn't
develop a "Back Bow". If the guitar was in a humidity controlled
environment � and then left that environment - it is extremely possible
that a back bow has developed - especially in the circumstances you have
described. You need to have the guitar checked out by a competent luthier.
One thing I don't understand is what you wrote:
who looked it over, tapped it, and told me that everything on it was
perfect- the frets were all lined up right, the neck was set right, the
action was already fairly high.
this person who looked over you guitar - did he:
- use a straight edge on the neck to insure that the neck set, fret level
and relief were all within spec?
- measure the action (with a ruler) to determine that it wasn't too low?
- check the instrument out inside with a light and mirror to see if
everything inside was healthy?
I still don't know what the "tapping" was in aid of.
Oh, and by the way - if the action on a guitar has to be set so high that
it is extremely uncomfortable to play just to avoid what you described as
- "a very persistent and annoying buzz coming from the low E string
....but on the first five frets of the E it rattles like an African thumb
piano, making open E and G chords out unlistenable" - Guess what -
It's not "Perfect"
I am completely against the idea of taking
a guitar (and a very nice one I might add - not to mention "not
cheap" by any means) and stuffing credit card strips under the saddle
- they don't belong there - if indeed you needed the action raised - a new
saddle is in order - and I don't think you needed a new saddle. The
thickness of three credit card strips equals about .090 of an inch (that's
90 thousandths - I just measured several credit cards to check) This will
raise your action by 3/32nds at the saddle and about 3/64ths at the 12th
fret - completely unnecessary on a guitar that this guy described as
having an "action was already fairly high" - not to mention that
I don't like the whole practice of shimming saddles. It does nothing for
the tonality of a guitar and in this case was probably the wrong thing to
do.
as far as your comment that "raising the action will take care of the
buzz" - you are right - but raising the action on a guitar to make it
uncomfortable to play is unacceptable. You bought a guitar - presumably
new and with a warranty - it should play like it did in the store. Tell
them to make it perfect or take it back - you can also contact Larrivee
and ask them for a reputable warranty shop near you and have them check it
out - or take it to a good luthier and have him/her take a look.
The answer to your final question:
- can this guitar be both playable and buzz free?
Yes - any guitar can be made to play like a dream and be buzz free. No
if's, and's or butt's. If these people can't make that happen � find
someone competent enough who can - don't settle for anything less - not
one of our clients has ever had to.
I apologize if the tone of my response was a bit "huffy". I get
hundreds of emails like this and sometimes it gets to me. I tend to go on
a bit when that happens - I apologize.
get back to me and tell me what happens - I am very interested in your
progress. Good luck and keep me posted.
P.S. - a little test that I like is as
follows - If a "guitar tech" try's to determine if a neck is in
good shape by doing one of the following things - it is a sure sign that
they don't know what they are looking at.
1. holding the guitar under the headstock
facing up and lifting the guitar off the table, while closing one eye and
glancing down the fingerboard to check if the neck is straight or not - I
have even seen some people do this to presumably check to see if the neck
is set properly. Doing this tells you nothing.
2. holding the guitar at eye looking down the neck from the butt end of
the guitar over the bridge to glance down the neck to check the same as
above. Also the sign of someone who is trying to look the part but sees
nothing.
I am planning to put pics of this on the web site as a warning to all.
Once again my apologies for being a bit "huffy"
Musically Yours,
Doug Proper
Back to top
Q:
Doug,
Hello, my name is Dennis and I have a question concerning a guitar that I
own. I have the Ibanez PM100 hollow-body jazz guitar. The bridge on the
guitar is a free-floating bridge. I was going to ask Ibanez this question
but they have no contact phone numbers or email which I thought was kind
of odd, the closest I got was a contact with Chesbro, I found it kind of
odd that Ibanez has no contact phone numbers; but that's beside the point.
Anyway, here's what's happening, when I change the strings on my guitar
because the bridge isn't fixed onto the guitar I can slide it forward or
back and basically put it anywhere on the body that I want. I want to get
the best possible intonation and sound that is possible and I'm wondering
what the logic behind the free-floating bridge is. I was told by one
guitar shop that I should measure the distance from the 12th fret to the
nut and basically go the same distance for the bridge. I recently changed
strings and I experimented with sliding it a little bit back to see if it
made anything sound different. I need to reset the intonation but I'm
still trying to figure out the optimal place for the bridge.
I'm also want to start making my own truss rod adjustments and are there
any articles or advice that you might have for making these types of
adjustments. I've heard that sometimes it's good to give a little relief
from the frets and add a little more convex curve (more distance from the
frets to the strings). Is the setting more of a fixed setting or is it
something that varies from one playing style to another. I'm playing a lot
of jazz and I want no buzzes with the strings, I want the most solid,
clean sound I can get overall on the fretboard. Will giving more relief,
making it more convex allow the strings less opportunity to buzz. I
recently raised my > action and that seemed to make the biggest
difference with the string buzzes.
Finally, one more question. If you are familiar with the PM100, I'm trying
to locate a truss rod wrench. The guy at a shop told me he was able to use
a Gibson short arm hex key. Ibanez doesn't list the measurement of this
bolt, do you happen to know the specific measurement of the hex key for
the PM100.
Can I order this from somewhere online?
Thanks for your time, I hope these weren't too many questions. I'm just
trying to make my guitar sound the best that I can.
Dennis
A:
Hi Dennis,
It doesn't surprise me that the manufacturer is not easy to get in
touch with - most of the big makers are not interested in dealing with day
to day questions concerning their guitars - they would probably prefer
that you deal with the store you bought it from - that is why they
establish a dealer network - so they don't have to care for each customer
directly. Whether you agree with it or not that is how most companies
operate - and in a sense you can't blame them - they would have to hire
tremendous staffs just to deal with everyday questions. However, I do
think that they could do a better job educating there dealers.
Lets see if I can get through your questions:
Among others - The reason your bridge is not fixed is because the type of
tailpiece you have is designed to put downward pressure on the bridge and
vibrate the top. This type of bridge/tailpiece setup is called a trapeze
style tailpiece and a floating bridge. The bridge is moveable allowing you
to adjust the intonation and bridge placement very easily. You were
informed correctly - at least as a starting point - the bridge should be
roughly twice the distance from the nut to the 12th fret. This will get
you in the ballpark. However there is need for what is called string
length compensation. In other words - setting your intonation.
As far as Intonations is concerned - This is how I would proceed � I
normally string the guitar (during a restring) with just the outer two
strings then place the bridge where I think it should go - twice the
distance from the nut to the 12th fret. Having just the two outer strings
on the guitar will make to bridge easier to move about. Once the bridge is
in place - string up the rest of the guitar - and tune it to pitch. I set
the intonation on the guitar as the very last thing I do - I want to make
sure that the action is where I want it and the relief in the neck is
correct prior to adjusting the intonation - if I don't then I will very
likely have to go back and make some adjustments. With everything else as
it should be you want to make sure that the pitch at the 12th fret is
exactly to same as the 12th fret harmonic. You can also use the open
string as a reference. I do both - just to make sure. If the fretted note
at the 12th fret is sharper than the open string (or 12th fret harmonic
for that matter), then the bridge (or the individual saddles in your case)
needs to be moved away from the nut - in effect lengthening the string.
Conversely, If the pitch at the 12th fret is flatter than the open string
(or 12th fret harmonic for that matter) then the bridge (or the individual
saddles in your
case) needs to be moved closer to the nut - in effect shortening the
string. Do this gradually in increments until you get each sting in tune.
In your case, you have a Tunamatic bridge on that guitar - this allows you
to adjust each string individually with relative ease. In the case of a
completely wooden bridge one would have to re-shape the top of the bridge
to set the string length compensation. I would recommend that most people
have a qualified luthier handle that job.
An electronic tuner is a great help when doing what I described above
since you can "see" the pitch on the readout of the tuner
instead of relying on your ears.
As far as setting the relief on your neck is concerned - there is no real
"set" rule for how much relief is too little or too much. In my
opinion the best way to measure relief is with a 24" straight edge
lying on the neck
between the D and G strings. I hold it in place (with the guitar in
playing position) and measure the distance from the top of the 7th fret to
bottom of the straight edge. (by the way - don't use a yard stick from the
local
hardware store - there is nothing straight about them). I use feeler
gauges to measure the distance in thousandths of an inch. here's how it
works � if a .015 gauge fits in the gap between the fret and straight
edge and a .017 doesn't then you can figure that the relief is 16
thousandths of and inch. If you need less relief (less gap) than you
tighten the truss rod. If you need more - loosen it. - A quick tip here -
always loosen the rod first if it hasn't been adjusted in a while -
sometimes they stick a bit - and it might take a nudge to move it freely -
loosening it first will insure that you don't tighten it to much and run
the risk of ruining the thread � or worse - snapping the rod. It is also
always a good idea to make sure the truss rod nut is well lubricated -
gear oil is what we use. you would be surprised how much easier a well
lubricated truss nut works.
As far as how much relief you should have - that is a little less
predictable - yes it does depend on the player. When we do John
Abercrombie's guitar - he plays with such a low action, a light touch and
doesn't use a pick so his relief is set to no more that .004".
However, John Scofield's guitars need a bit more relief since he plays
with a much more aggressive attack. So we set his relief to about .011 or
.012. That seems to be where he likes them. I set all of Joe beck's
guitars to .010. So you can see that there is room for compromise - all of
the above also presumes that you have well maintained, level and well
crowned frets. If
your frets are worn or not level you may need to make the specs a bit more
forgiving. I would guess that all things being equal that your relief
should be about .010 to .012. try that and adjust as you see fit for you
playing style.
Here are a few measurements I would shoot for when setting up your
PM100. And the order I would adjust them in.
Relief - .010" to .012.
String height at the 12th fret (measure this with a small ruler divided
into 64ths of an inch. While pressing the string down at the first fret
measure the distance from the top of the 12th fret to the bottom of the
string.
High E - 3/64ths"
Low E - 4/64ths"
On an archtop guitar you turn the thumb wheels up or down to affect this -
the middle strings should graduate evenly from the low to high string
measurements. On your guitar you only have to worry about the outer two -
the middle strings should take care of themselves.
Set the intonation as discussed above.
Go back and double check all your measurements - your guitar should play
very comfortably.
All of the tools I mentioned above are available from Stewart MacDonald's
Guitar Shop Supply. You can find them on the links page of our site. There
is a tremendous amount of money one can spend on tool, toys and gadgets
for guitar tinkerers out there. You can also find the truss rod wrench you
are looking for there as well. Call them and ask for the catalog - Lots of
neat tips in there as well.
Good luck and let me know how it works out - I would be interested in your
progress. If there is anything else you have questions about - let me know
- it might take a couple of days - but I do answer all emails.
Musically Yours,
Doug Proper
Back to top
|